Contribution & Community
We are open and grateful for any contribution made by the community. If you're interested in contributing to SkyeKiwi, this document will guide you the way.
The Open Source Guides website has a collection of resources for individuals, communities, and companies who want to learn how to run and contribute to an open-source project.
For contributors and those who are new to open source:
👊 Code of Conduct
Please read the full text to understand what interpersonal actions will and will not be tolerated.
😎 Get Involved
There are many ways to contribute to SkyeKiwi, and some of them don't involve writing any code. Here are a few ideas to get started:
- Just joined the SkyeKiwi Community. Does everything work as expected? If not, we're always looking for improvements. Let us know by opening an issue.
- Help us solving open issues by suggesting workarounds or fixing them.
- Improve open issues to make them more clear, readable, and understandable for others.
- Read through the SkyeKiwi docs. If you find anything confusing or that can be improved, feel free to make improvements by clicking "Edit" at the bottom of the doc page.
- Take a look at the features requested by others and consider opening a pull request if you see something you want to work on.
Join our Discord Server
Contributions are very welcome and not bound to Github. You can also contribute to our Discord Community by helping other people who might face a problem you already have solved.
Improve Issues and Pull Requests
One great way to contribute without writing any code is to improve open issues and pull requests.
- Ask for more information if you believe the issue does not provide all the details required to solve it
- Suggest labels that help to categorize issues/pull-requests
- Flag issues that are stale or that should be closed
⏰ Our Development Process
SkyeKiwi uses Github as its source of truth. All changes made so far and made in the future are and will remain publicly accessible here.
Branch Organization
SkyeKiwi has two primary branches: master and develop.
master contains the latest released code.
develop is where the development takes place.
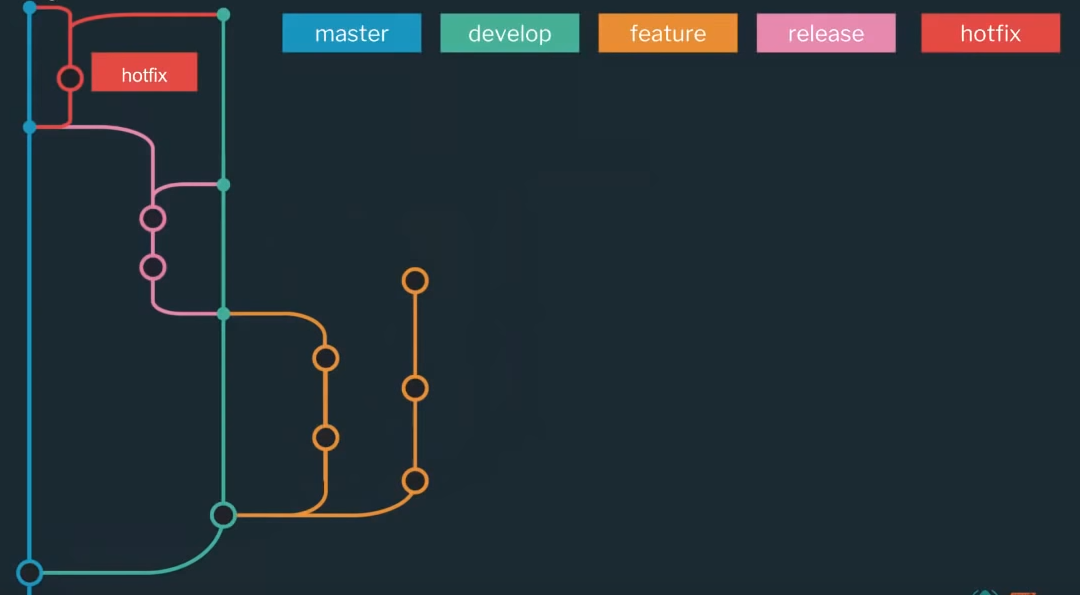
The root of all your feature branches have always to be the develop branch!
🐞 Bugs
We use GitHub Issues to keep track of our bugs. If you would like to report any problem, take a look around and see if someone already opened an issue about it. If you are confident this is a new, unreported bug, you can submit a bug report.
📕 Reporting New Issues
When opening a new issue, always make sure to fill out the whole issue template. This step is very important! Not doing so may result in your issue not managed in a timely fashion. Don't take this personally if this happens, and feel free to open a new issue once you've gathered all the information required by the template.
- One issue, one bug! Please report a single bug per issue.
- Provide reproduction steps! List all steps that are necessary to reproduce the issue. The person reading your bug report should be able to reproduce your issue with minimal effort.
⏳ Installation
- Ensure you have Yarn installed
- After cloning the repository, run
yarn run install:packagesin therootof the repository. This runsyarn installin each AgileTs package to ensure all required dependencies are installed.
Run Example Project's
- Follow the Installation steps above
- Ensure you have Yalc installed
- Run
yarn run dev:publishto publish all packages in your local 'yalc/(npm)' store - Execute
yarn install:agilein the Example Project in order to install its dependencies correctly - When you have made the desired changes. Run
yarn run dev:pushto push your updated changes to your local 'npm store'
. ProTip: To make changes in real-time, runyarn run watch, which will automatically runyarn run dev:pushwhenever you updated a file in the corresponding package.
☄️ Pull Request
Your First Pull Request
So you have also decided to merge code back to the upstream by opening a PR. You've invested a good chunk of time, and we appreciate it. We will do our best to work with you and get the PR looked at.
Working on your first Pull Request? You can learn how from this free video series:
How to Contribute to an Open Source Project on GitHub
We have a list of beginner friendly issues to help you to get your feet wet in the AgileTs codebase and familiar with our contribution process. This is a great place to get started.
Proposing a Change
If you would like to request a new feature or enhancement but you only want to give an impulse and don't want to implement it, feel free to create an issue that follows the feature template.
If you're only fixing a bug, it's fine to submit a pull request right away, but we still recommend creating an issue detailing what you're fixing. This is helpful in case we don't accept that specific changes but want to keep track of the issue.
Sending a Pull Request
Keep in mind that small pull requests are much easier to review and more likely to get merged. Ensure your PR only solves one problem (issue). Otherwise, please split it up into multiple PR's for a better overview. Commit Messages that follow this style guide are very welcome ^^
Please make sure the following is done before submitting a new pull request:
- Fork the repository and create your branch from
develop - Make sure your code is right formatted (
yarn prettier) - Make sure all Jest tests pass (
yarn test) - Don't forget the How has this been Tested? part!
All pull requests should be opened against the develop branch
and have a related Issue for better organization!
Breaking Changes
When adding a new breaking change, follow this template in your pull request:
### New breaking change here

- **Who does this affect**:
- **How to migrate**:
- **Why make this breaking change**:
- **Severity (number of people affected x effort)**:
What Happens Next?
The Core Team of AgileTs is constantly monitoring pull requests and merges them if they seem correct. Help us to keep pull requests consistent by following the guidelines above.
🌟 Style Guide
Prettier will catch most styling issues that may exist in your code.
You can check the status of your code styling by simply running yarn prettier.
Most important: Look around. Match the style you see used in the rest of the project(formatting, naming, ..).
🚀 Releasing Process [Admin]
AgileTs is published in the npm store.
🔐 Check publish rights
Get access from the AgileTs npm admins (@bennodev19).
Github
You need publish access to the main AgileTs repository (not a fork).
NPM
For publishing a package in the below workflow, you need no npm publishing rights. It is published via a Github action that handles the publishing process for us and saves us work.
If you, for whatever reason, need to publish a package manually,
publishing will only work if you are logged in to npm with an account with publishing rights to the @agile-ts/ team/packages.
If you are not currently logged in to npm on your CLI, do the following:
npm login- Enter username, password, and associated email address
- Enable 2FA on your account (required for publishing process)
🏃 Workflow
1. Git setup
Checkout the develop branch and
make sure that each release change is merged into it.
Only the develop branch is allowed to be merged into the master
and thus be the next release! See 'Our Development Process'.
git fetch origin develop
git checkout origin/develop
git fetch --tags // To generate the correct changelog later
2. Test and build packages
- Run
yarn testin therootof the project and ensure that all tests run green - Run
yarn packin therootof the project, which simply builds and packs the packages with the files as they will be released.- Check if all packages could be built
- Check that each package built contains the files to be delivered
3. Create Pull Request to master
Now that we know each package can be built correctly and works as expected,
we create a pull request to the master branch.
master <-- develop
Pull Request Title= 'New Release 🎉'.Pull Request Descriptionis generated in the next step (Step 4) and will be a changelog based on the previous (in thedevelopbranch) merged pull requests.
4. Create Changelog
The changelog uses GitHub labels to classify each pull request.
Use the GitHub interface to assign each newly merged pull request to a GitHub label starting with tag:. Otherwise, the PR won't appear in the changelog.
Check tags of all recently merged Pull-Requests
The tag: label prefix is for PRs only!
Other labels are not used by the changelog tool,
and it's not necessary to assign such labels to issues, only PRs!
Generate a GitHub auth token by going to https://github.com/settings/tokens
(the only permission needed is public_repo). Save the token somewhere for future reference.
Generate the changelog in the root of the project with:
GITHUB_AUTH=<Your GitHub auth token> yarn changelog
Copy the generated content and paste it as a description into the in Step 3
created Pull Request. Save the changelog somewhere in between because we need it again in the next step (Step 5).
5. Bump Version
We don't manually increase the versions of the packages to be released.
Instead, we run yarn version:bump in the root of the project.
This will trigger Changeset.
Changeset is a handy tool to manage versioning and changelogs with a focus on multi-package repositories.
In order for Changeset to bump the versions correctly, we need to pass 3 questions from it:
�  Which packages would you like to include? ...
√ changed packages
  √ @agile-ts/api
  √ @agile-ts/core
  √ cra-template-agile
  √ cra-template-agile-typescript
  √ @agile-ts/event
  √ @agile-ts/logger
Select the packages where something has changed, and thus, the version needs to be incremented.
�  Which packages should have a major bump? ...
√ all packages
  √ @agile-ts/api@0.0.17
  √ @agile-ts/core@0.0.16
  √ cra-template-agile@0.0.5
  √ cra-template-agile-typescript@0.0.5
  √ @agile-ts/event@0.0.6
  √ @agile-ts/logger@0.0.3
  √ @agile-ts/multieditor@0.0.16
  √ @agile-ts/proxytree@0.0.2
  √ @agile-ts/react@0.0.17
Decide how the version of the selected packages should be bumped (major, minor, patch).
Note: If no package has a major bump, just press [ENTER] with no package selected,
and it will ask the same question based on minor version bumps, ..
�  Please enter a summary for this change (this will be in the changelogs). Submit empty line to open external editor
�  Summary »
Here we pass the changelog generated in Step 4.
6. Commit changes and merge master <- develop
Now we are nearly done with the manual part.
Commit the file generated in the .changeset folder to the develop branch.
After committing, we wait for each github/circleci action to complete successfully.
- If they
fail, we have to figure out why and fix the issue - If they
succeed, we merge the previously (in Step3) created pull request (master <- develop)
7. Merge master <- 'Next Release'
If the merge was successful, Changeset created a new Pull Request called 'Next Release'
from the branch changeset-release/master to the master branch.
In doing so, Changeset automatically incremented the versions and adjusted the changelogs.
Before we merge, we should double-check if the versions have been increased correctly and that everything else seems correct.
Because after we have merged, there is no going back.
After the merge, the changed packages are automatically built and sent to npm.
In addition, Changeset creates the appropriate tags and releases in GitHub.
8. Merge master -> develop
So that the devlop branch does not become obsolete,
we merge the master into the develop branch at the end.
📄 License
By contributing to AgileTs, you agree that your contributions will be licensed under its MIT license.
🎉 Credits
This File is inspired by the Docusaurus CONTRIBUTING.md.