Write, Deploy & Interact With Your First Secret Contract
This tutorial will walk through a typical process for writing and deploying a secret smart contract on SkyeKiwi. Refer to Environment Setup to setup your Rust and Nodejs environment.
If you had developed smart contracts on Near, you would find our smart contract SDK to be very similar to Near. If you have not, no worry, it's pretty straightforwards.
For your reference to a broadly rundown of Near smart contract SDK, here's the documentation site.
Getting Start
The simpliest way to get started would be fetch a pre-built toolkit by us from Github.
git clone https://github.com/skyekiwi/kiwi-contract
cd kiwi-contract
yarn
A Sample Smart Contract
In the kiwi-contract/contract folder you will find a sample smart contract. The contract would be every straight forwards. It set a "status" when you call set_status and give you the status when you call get_status.
// -- kiwi-contract/src/src/lib.rs --

#[skw_bindgen]
#[derive(BorshDeserialize, BorshSerialize)]
pub struct StatusMessage {
    pub records: LookupMap<AccountId, String>,
    pub unique_values: LookupSet<String>,
}

impl Default for StatusMessage {
    fn default() -> Self {
        Self {
            records: LookupMap::new(StorageKey::Records),
            unique_values: LookupSet::new(StorageKey::UniqueValues),
        }
    }
}


#[skw_bindgen]
impl StatusMessage {
    /// Returns true if the message is unique
    pub fn set_status(&mut self, message: String) -> bool {
        let account_id = env::signer_account_id();
        self.records.insert(&account_id, &message);
        self.unique_values.insert(&message)
    }

    pub fn get_status(&self, account_id: AccountId) -> Option<String> {
        self.records.get(&account_id)
    }
}

// -- kiwi-contract/src/src/lib.rs --
Compile Or Test Your Contract
In the kiwi-contract directory. Use yarn contract:compile to compile your contract. Some people might encounter issues with wasm32-unknown-unknown when compiling. The issue can be resolved by following the hint by the compiler (usually ... run rustup target add wasm32-unknown-unknown). The script will also copy the .wasm binary to contract/res/xxx.wasm.
To run off-chain testing of the contract, use yarn contract:test.
For those who never used Rust before, Rust might takes A LOT of time to compile. Apple Silicon compiles Rust pretty fast tho.
For the next setup, we would get to the on-chain parts.
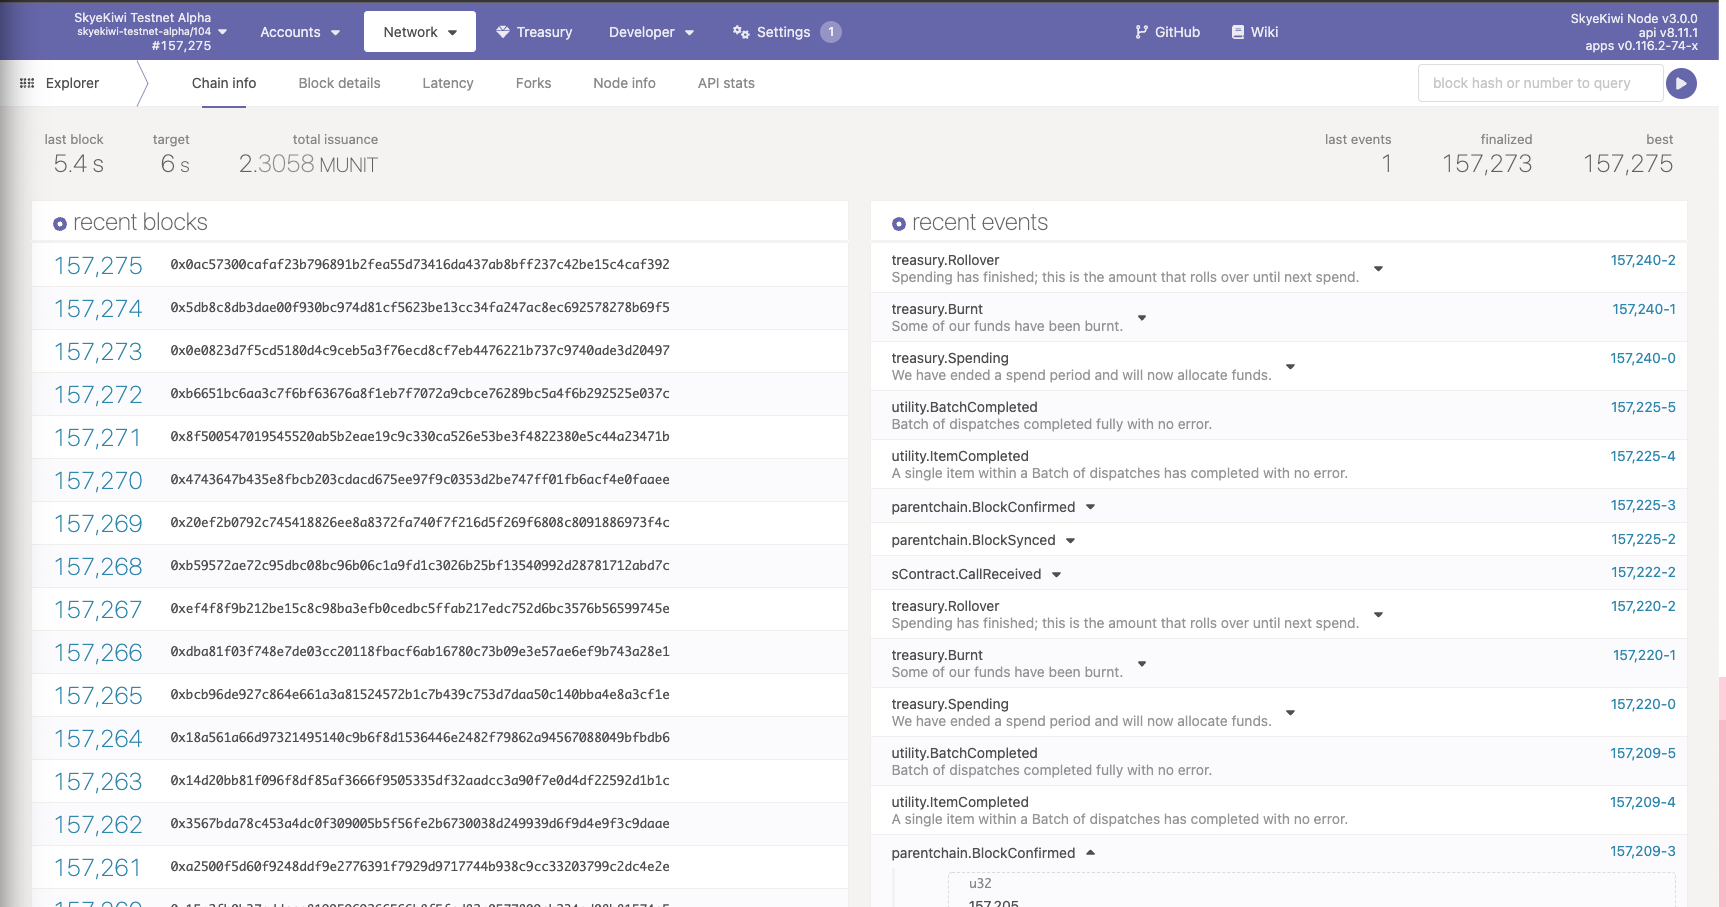
The SkyeKiwi Network Web UI
While we are in procesess of building a more customized UI, the PolkadotJs App could be a great tool for viewing realtime network traffice status. Use this link to access. You would see an interface that looks like this:
Generate Your Seed Phrase & Grab Testnet Faucet
If you are well familar with the idea of Seed Phrase and how to generate one, you can skip this section and just generate an .env with SEED = 'xxx xxx .... ' and be good to go.
Otherwise, we have integrated a simple tool for you. In the kiwi-contract directory. Use yarn random-seed would set up the seed phrase for you. It should give an output like:
➜ yarn random-seed
yarn run v1.22.17
$ ./node_modules/.bin/zx ./scripts/random_seed.mjs
$ echo $'SEED = \'obtain disease repair shield organ obscure empty high rapid trade bronze patch\'' > ./.env


The .env file has been created. You may use the faucet on discord to claim so test tokens
Your on-chain address is 5ENYyraV19Kw2M3U6kneVDsWqEKX48FiPopdfQhJpuQfwbS8
✨  Done in 0.51s.
Now you may grab your on-chain address and head over the discord and claim some testnet faucet tokens.
Config Your Toolkit
Go to kiwi-contract/scripts/config.mjs and make edits.
export default {
    rpcEndpoint: "wss://staging.rpc.skye.kiwi",

    // name your contract something! Contracts name must be unique.
    contractName: "collection_contract",
}
Create Your Account Inside the Enclave
Your usual blockchain account on the public chain is different than the account you have inside the enclave runtime. Actually, it will be shard-specific account. We do not charge users for execution inside the enclave, therefore, even though the security enclave has a gasometer but we do not actually charge gas.
In short, to interact with the enclave, you would first need to bridge your public account to enclave. We provide a very simple script to do so. by yarn chain:create-account
One common error can be thrown at this step includes:
➜ yarn chain:create-account
yarn run v1.22.17
$ ./node_modules/.bin/zx ./scripts/chain_create_account.mjs
Your on-chain address is 5ENYyraV19Kw2M3U6kneVDsWqEKX48FiPopdfQhJpuQfwbS8
2022-07-04 17:01:55        RPC-CORE: submitAndWatchExtrinsic(extrinsic: Extrinsic): ExtrinsicStatus:: 1010: Invalid Transaction: Inability to pay some fees , e.g. account balance too low
2022-07-04 17:01:55             DRR: 1010: Invalid Transaction: Inability to pay some fees , e.g. account balance too low
2022-07-04 17:01:55        RPC-CORE: submitAndWatchExtrinsic(extrinsic: Extrinsic): ExtrinsicStatus:: 1010: Invalid Transaction: Inability to pay some fees , e.g. account balance too low
RpcError: 1010: Invalid Transaction: Inability to pay some fees , e.g. account balance too low
    .....
✨  Done in 4.79s.
Well... go claim some faucet token first with your account displayed. (i.e. 5ENYyraV19Kw2M3U6kneVDsWqEKX48FiPopdfQhJpuQfwbS8).
Otherwise, you will get an message like:
➜ yarn chain:create-account
yarn run v1.22.17
$ ./node_modules/.bin/zx ./scripts/chain_create_account.mjs
Your on-chain address is 5ENYyraV19Kw2M3U6kneVDsWqEKX48FiPopdfQhJpuQfwbS8
✨  Done in 9.87s.
Now you might go to the explorer and see some events emitted like:
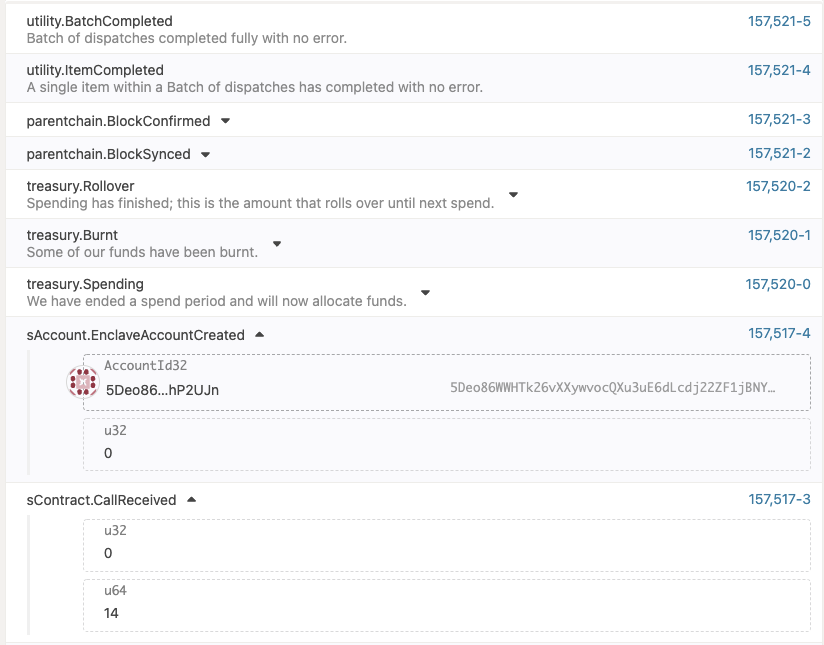
In the graph above, on BlockNumber #157,517 The blockchain received the request to create an account inside the enclave for the account_id at ShardId 0, and subsequently push a off-chain transaction, labeled ShardId 0, CallIndex 14. 4 blocks later, on BlockNumber 157,521, the off-chain worker published the outcome back and the blockchain runtime emitted events parentchain.BlockSynced for BlockNumber #157,521.
Now, you have successfully created an account inside the enclave. Now we can proceed with deployment.
Deploy the Contract
Run yarn chain:deploy to deploy the contract. The script will first compile and test the contract, then start the deployments.
Your might encounter an error message like this on the last row, this means somethng went wrong and it can be complicated. We will eventually tweak the script to display a detailed error messages. Usually, it is caused by contract name collision. Try change the name of your contract on the previous step. Rest assure, the blockchain call failed on local dry-run and is not sent to blockchain or consume any gas fee yet.
➜ yarn chain:deploy
yarn run v1.22.17
$ ./node_modules/.bin/zx ./scripts/chain_deploy.mjs
$ yarn contract:test
$ yarn contract:compile
$ ./node_modules/.bin/zx ./scripts/contract_compile.mjs
$ ./node_modules/.bin/zx ./scripts/contract_test.mjs
$ cd ./contract && cargo build --target wasm32-unknown-unknown --release
$ cd ./contract && cargo test -- --nocapture
    Blocking waiting for file lock on package cache
    Blocking waiting for file lock on package cache
    Blocking waiting for file lock on package cache
    Blocking waiting for file lock on package cache
    Blocking waiting for file lock on package cache
    Blocking waiting for file lock on package cache
    Finished release [optimized] target(s) in 0.22s
$ cp ./contract/target/wasm32-unknown-unknown/release/*.wasm ./contract/res/
    Finished test [unoptimized + debuginfo] target(s) in 0.19s
     Running unittests (target/debug/deps/status_message-66d8aeefe01c519c)

running 3 tests
test tests::get_nonexistent_message ... ok
test tests::set_get_message ... ok
test tests::set_unique_message ... ok

test result: ok. 3 passed; 0 failed; 0 ignored; 0 measured; 0 filtered out; finished in 0.00s

WASM Bytes Uploaded Qmeox5wNhMgVJ4Tm4XLFsVmKyyr1pS7jNgior3KcRCsA4L
Your on-chain address is 5Deo86WWHTk26vXXywvocQXu3uE6dLcdj22ZF1jBNYhP2UJn
  ↪ ❌  Send transaction(4) failed.
If no error displayed, the deployment is accepted on chain. Now, go over to the explorer, you would see a message like this below. Similar to what we had earlier, contract is deployed into ShardId 0 and the block is mined 3 blocks later on parentchain.BlockConfiemd #157,649.

Play with Your Smart Contract
Now, you can play with your smart contract. You can call the contract function set_message to set a message, and then call the contract function get_message to get the message. Interacting with smart contract on SkyeKiwi comes with a bit twist as we have a customized call encoding schema for calls.
Go to kiwi-contract/scripts/chain_interact.mjs. You can noticea block of code that looks like:
const statusQueryCall = new Calls({
    ops: [
        new Call({
            origin_public_key: keypair.publicKey,
            receipt_public_key: blake2AsU8a(CONTRACT_NAME),
            encrypted_egress: false,

            transaction_action: 2,
            contract_name: stringToU8a(CONTRACT_NAME),
            amount: null,
            method: stringToU8a('set_status'),
            args: stringToU8a(JSON.stringify({message: "Change name again"})),
        }),
        new Call({
            origin_public_key: keypair.publicKey,
            receipt_public_key: blake2AsU8a(CONTRACT_NAME),
            encrypted_egress: false,

            transaction_action: 3,
            contract_name: stringToU8a(CONTRACT_NAME),
            amount: null,
            method: stringToU8a('get_status'),
            args: stringToU8a(JSON.stringify({account_id: u8aToHex(keypair.publicKey)})),
        }),
        new Call({
            origin_public_key: keypair.publicKey,
            receipt_public_key: blake2AsU8a(CONTRACT_NAME),
            encrypted_egress: false,

            transaction_action: 3,
            contract_name: stringToU8a(CONTRACT_NAME),
            amount: null,
            method: stringToU8a('get_status'),
            args: stringToU8a(JSON.stringify({account_id: u8aToHex(decodeAddress('5FEUorjS7nVnca5YFcmRAmPFS3ojHxjFXop8abdhpRG8z1ty'))})),
        }),
    ],

    block_number: 0,
    shard_id: 0,
});
This is the pre-encoded call that is about to be sent to the blockchain for execution. In the sample above, we are sending a batch of 3 Calls for execution.
The first Call is to set the status message. The
transaction_actionis set to 2, which means the call modifiy the smart contract state. Thecontract_nameis set to the name of the contract, which isstatus_message. Themethodis set toset_status, which is the name of the function we want to call. Theargsis set to the JSON string of the arguments we want to pass to the function.The second Call is to get the status message. The
transaction_actionis set to 3, which means the call reads the smart contract state (i.e. a View function). And it queries for the message for the sender themselve!The last call is also a view call with
transaction_actionset to 3. It quries the state of another address.
You may batch as many as you'd like, we have a very high upper limit for calls in a batch.
Similar to what we have done before, go to the explorer and you may see the messages like:
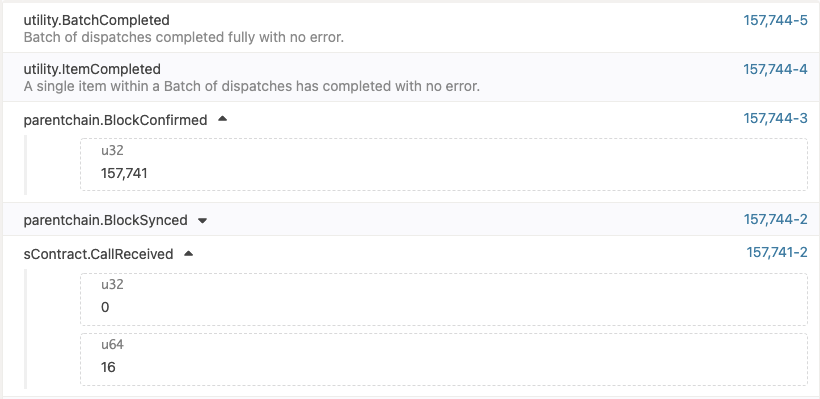
Guess what, the call was received with CallIndex 16 on ShardId 0, and mined three blocks later on BlockNumber 157,744.
Our script also included a simple parse of outcome for you. The terminal will outcome something like:
➜ yarn chain:interact
yarn run v1.22.17
$ ./node_modules/.bin/zx ./scripts/chain_interact.mjs
Your on-chain address is 5Deo86WWHTk26vXXywvocQXu3uE6dLcdj22ZF1jBNYhP2UJn
The CallIndex of your call is 16, trying to fetch over the outcome of the call now
Now, sleeping for 30 seconds and wait for the result to be populated


======= OUTCOMES =======

==> Outcomes for OP# 0
Status(empty == success): "true"
View Result:
View Error (if any):

==> Outcomes for OP# 1
Status(empty == success): ""
View Result: "Change name again"
View Error (if any):

==> Outcomes for OP# 2
Status(empty == success): ""
View Result: null
View Error (if any):

✨  Done in 39.87s.
Final Thoughts
That's pretty much it. I hope you find this tutorial easy to follow and have a clearer idea of how to work with smart contracts on SkyeKiwi.
There are still a lots of details that we haven't convered yet. Keep in mind that we have only enabled ShardId 0 for now.